
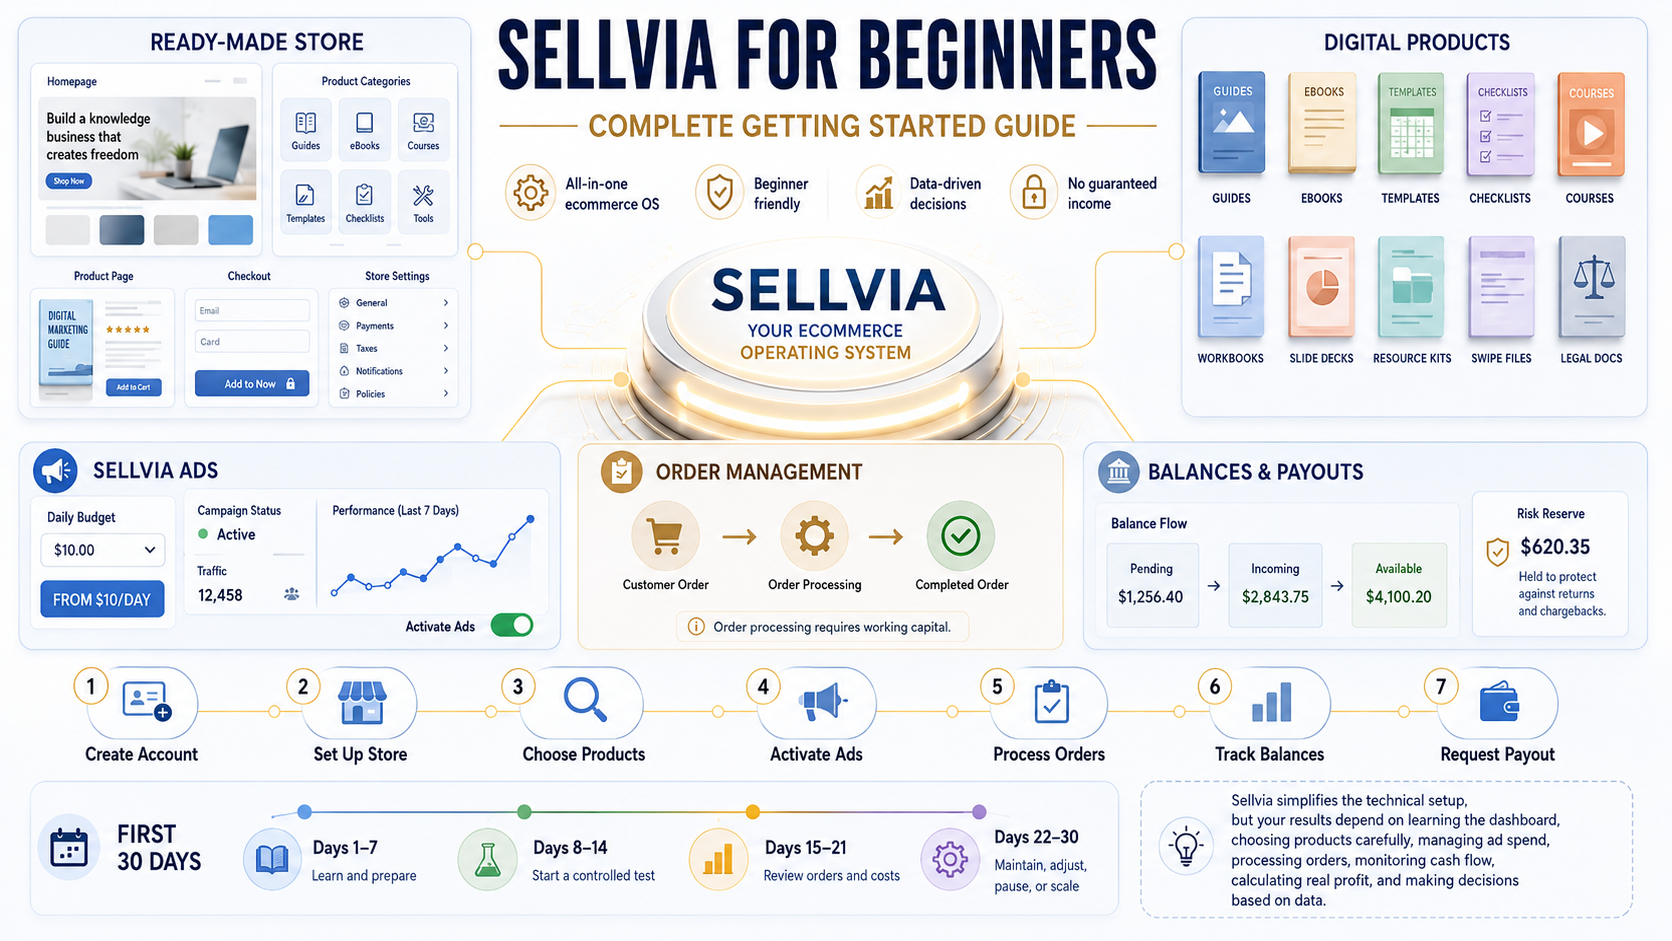
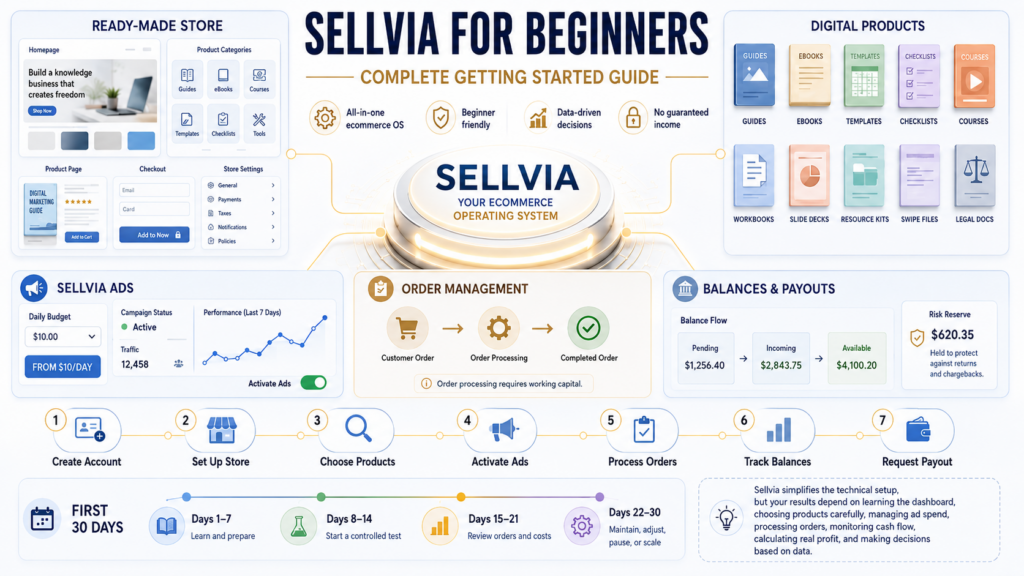
Sellvia for Beginners: Complete Getting Started Guide
A practical, first-month walkthrough of the Sellvia dashboard, products, advertising, order processing, balances, costs, and payouts.
You created your Sellvia account, logged into the dashboard, and now you’re looking at a store, a product catalog, an ads panel, an orders tab, and a handful of balance figures you don’t fully recognize yet. That’s a normal first reaction. Sellvia hands you a lot at once, and the platform doesn’t come with a printed manual explaining what to click first.
This guide is written for exactly that moment. It’s for people who are hearing about Sellvia for the first time and trying to decide whether to sign up, and it’s just as much for people who already registered and are staring at their dashboard wondering where to begin. Either way, the goal here is the same: give you a clear, honest, step-by-step understanding of what Sellvia actually is, how the pieces fit together, and how to move through your first 30 days without wasting money or momentum.
I write about the Sellvia platform for Sellvia.info. What follows is based on time spent inside the dashboard itself – reviewing the store structure, the product catalog, the ads panel, the order workflow, and the balance system – rather than secondhand impressions. I’m not going to promise you a specific income, because nobody honestly can. What I can do is walk you through exactly how the platform works, what it costs, and what separates a beginner who gets useful data from their first month from one who gets frustrated and quits.
Quick Answer
Sellvia is a turnkey ecommerce platform that gives beginners a hosted store, access to catalog products, automated advertising, order-management tools, and a staged balance and payout system. This guide focuses on launching with digital products, although the wider Sellvia ecosystem may also contain other product types. Sellvia reduces technical setup, but it does not guarantee sales: the owner still funds advertising and order processing, tracks fees, and manages cash flow.
Table of Contents
What Is Sellvia?
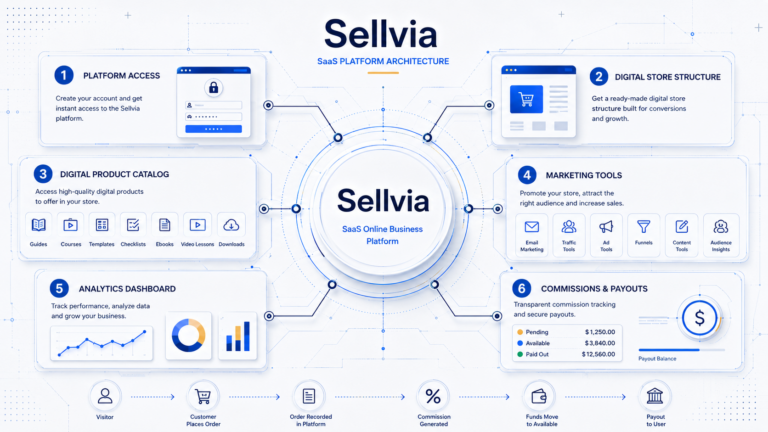
Sellvia is a hosted ecommerce platform that combines a turnkey store, a product catalog, automated promotional tools, order management, account balances, and payout controls inside one connected dashboard. The main advantage for a beginner is not a single feature; it is the fact that the operational pieces are already connected before the first product is promoted.
Sellvia is a turnkey ecommerce environment that lets a beginner start with a functioning store, add catalog products, attract traffic, process customer orders, and track earnings without assembling every tool independently.
This guide concentrates on the digital-product route: guides, ebooks, templates, checklists, courses, licenses, and other downloadable products. Sellvia’s wider catalog and fulfillment system can also include physical, branded, and print-on-demand items, depending on the products and services available in a particular account. That distinction matters because a beginner should choose one clear operating model instead of mixing unrelated products and workflows without a plan.
Sellvia is also more than a conventional website builder. A blank website builder gives you design controls and leaves the product sourcing, advertising, order fulfillment, payment flow, reporting, and support stack to you. Sellvia starts with a working structure and centralizes those tasks. The tradeoff is that you work within Sellvia’s ecosystem, fees, account rules, and dashboard workflow rather than controlling every technical component independently.
Current baseline figures
$39/month
Basic Sellvia PRO subscription
14 days
Free trial after store access is provided
$10/day
Starting Sellvia Ads budget
$100
Standard minimum Available balance for withdrawal
These figures were checked against Sellvia’s official terms and Help Center in July 2026. Always confirm the current values in My Account → Plans and the relevant dashboard screens before paying.
Is Sellvia Good for Beginners?
Yes, with a caveat worth stating plainly: Sellvia removes the technical barriers to starting, but it doesn’t remove the business decisions that determine whether a store performs well. A ready-made structure means you’re not learning web design or writing product descriptions from scratch. It doesn’t mean you can skip understanding your numbers.
Here’s how that plays out in practice.
| Beginner challenge | How Sellvia helps | What the user still needs to do |
|---|---|---|
| No store | Store is built and pre-loaded before you log in | Review the branding, navigation, and pages for your niche |
| No product | Digital product catalog is ready to browse | Choose products that fit a coherent theme, not just anything available |
| No traffic | Built-in advertising system connects to major ad networks | Set and manage a real budget; traffic isn’t free |
| No advertising experience | The system handles targeting and creative rotation | Monitor cost per order and adjust rather than “set and forget” |
| No order workflow | Orders appear automatically in the dashboard | Process orders and understand the fees attached to each one |
| No payment system | Built-in balance and payout tools | Learn the staged balance system before expecting instant withdrawals |
| No understanding of analytics | Reports section shows orders, spend, and traffic | Actually read the reports instead of guessing |
The honest takeaway: lack of experience is not a real obstacle on Sellvia. Lack of a budget, or an unwillingness to look at numbers regularly, is a bigger problem than lack of technical skill.
What You Get When You Join Sellvia
Ready-Made Digital Product Store
You don’t start with an empty page. The store arrives with a structure, a theme, and product placeholders already in place, which saves the setup time a beginner would otherwise spend picking a template and configuring pages from zero. That said, “ready-made” doesn’t mean “finished.” I’d still recommend reviewing the homepage copy, the navigation menu, and the product categories before pushing any traffic to the store, since a generic setup rarely matches a specific niche perfectly on day one.
A broader inventory of the platform is available in our guide to Sellvia tools.
Digital Product Catalog
The catalog includes categories like guides, ebooks, templates, checklists, courses, and other educational materials. The temptation for a new user is to add a wide mix of unrelated products to “see what sticks.” In my own review of the catalog, the stores that made more sense were the ones organized around a single theme – for example, a store focused on productivity tools and templates, rather than one that mixes productivity content with fitness guides and hobby checklists in the same storefront.
A simple way to think about it: a broad store with ten unrelated categories asks a visitor to figure out what the store is even about. A focused store with one clear theme and several related products answers that question before the visitor has to ask it. The catalog is a starting point, not a promise – what you select and how you organize it still matters.
Sellvia Dashboard
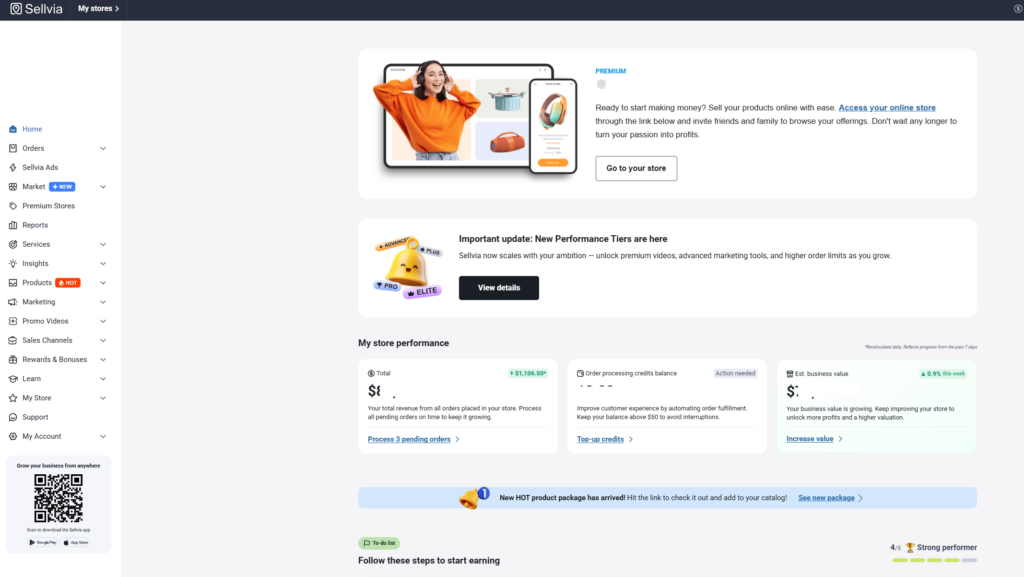
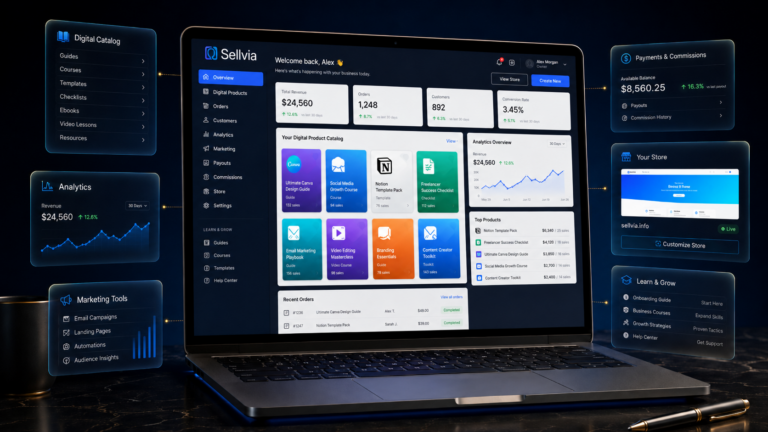
The dashboard is organized around the parts of the business that require action: products, Automated Promotions, orders, reports, subscription plans, processing credits, and the Commission balance. On my first review, the product catalog was easy to understand, but the money flow required more attention because Total Earnings, Commission Balance, Pending, Incoming, Available, and Risk Reserve do not mean the same thing.
My recommended first-login sequence is: My Account → Plans, then My Account → Home, followed by Orders, Orders → Order Processing, Automated Promotions, and Reports. That order shows you what renews automatically, what you must pay to process an order, and what portion of a sale is actually withdrawable.
For a screen-by-screen explanation, see our Sellvia dashboard overview.
Built-In Sellvia Ads
Sellvia Ads is an optional automated advertising service. According to Sellvia’s current Help Center, it can promote store products across channels such as Google, Facebook, Instagram, TikTok, and Amazon while Sellvia handles campaign setup, targeting, monitoring, and optimization. That is useful for a beginner who does not want to build several advertising accounts, but it does not eliminate advertising risk.
The starting advertising budget is $10 per day. Higher levels unlock after continuous campaign activity:
| Daily ad budget | When it becomes available | What it means |
|---|---|---|
| $10/day | First 5 days | Initial learning and traffic test |
| $15/day | After 5 continuous days | More daily reach; not a different ad product |
| $20/day | After 10 continuous days | Higher spend and data volume |
| $30/day | After 20 continuous days | Expanded traffic budget |
| $50/day | After 30 continuous days | Highest standard daily level shown in the current guide |
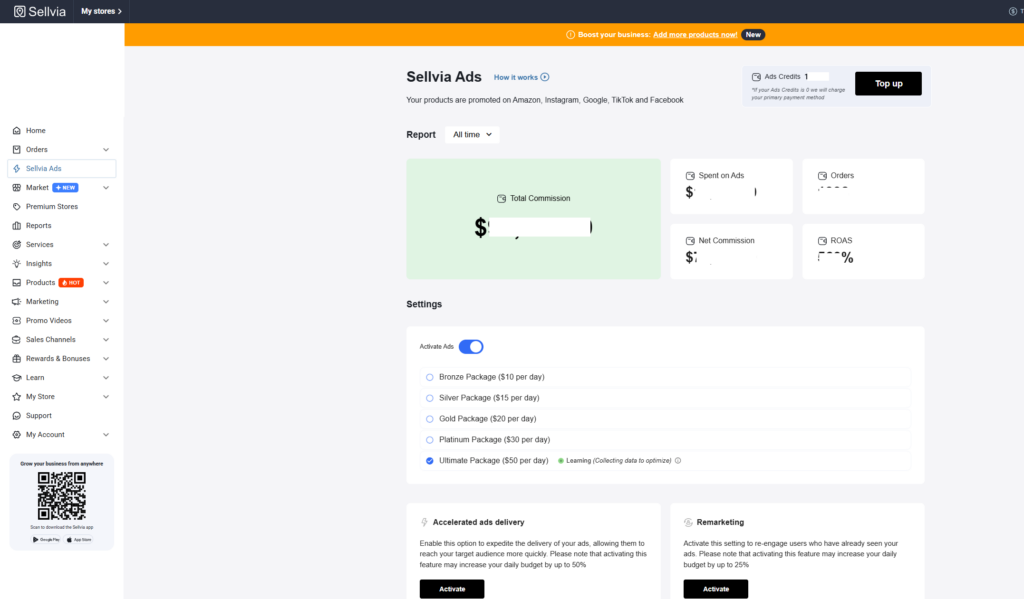
Following the minimum unlocked schedule for the first 30 days would represent $625 in ad spend: five days at $10, five days at $15, ten days at $20, and ten days at $30. This is advertising spend only. Sellvia currently states that an advertising management fee is applied on top, so the actual charge can be higher than the selected daily budget.
Accounts may receive a complimentary $40 Ads credit. Once it is used, ads can continue charging the saved payment method if the service remains active. That is why the Activate Ads toggle and any outstanding invoice should be checked deliberately rather than assumed to be off.
Advertising buys traffic; it does not guarantee a profitable order. Track spend, visitors, orders, cost per order, contribution per order, and the cash required to process those orders. Our separate guide explains how Sellvia Ads work in more detail.
Order Management
Orders appear in the dashboard as they come in, but a completed sale isn’t the end of the process. Each order needs to be reviewed and processed, and there are fees associated with that processing. This is a detail beginners commonly miss: the total sale amount shown on an order is not the same as the profit from that order. Between the product cost structure, processing fees, and the portion of ad spend allocated to that sale, the number you actually keep is smaller than the number you initially see.
Balances and Payout Tools
The Sellvia balance is easiest to understand as a pipeline rather than one wallet. The current full cycle is:
Pending → Incoming → Available + Risk Reserve
| Balance stage | What it means | What the beginner can do |
|---|---|---|
| Pending | The customer placed an order, but you have not completed the order-processing payment. | Process the order manually with a card or use sufficient Order Processing Credits. |
| Incoming | The processed order enters a mandatory 72-hour holding period. Calendar days, including weekends, are counted. | Wait; the funds move automatically after the holding period. |
| Available | After the hold, 75% of the processed sale moves here under the current rules. | Withdraw it, transfer it to Ads Credits, or transfer it to Processing Credits, subject to fees and account requirements. |
| Risk Reserve | The remaining 25% is held for 125 days as protection against refunds and chargebacks. | Wait for the reserve to move to Available automatically after the holding period. |
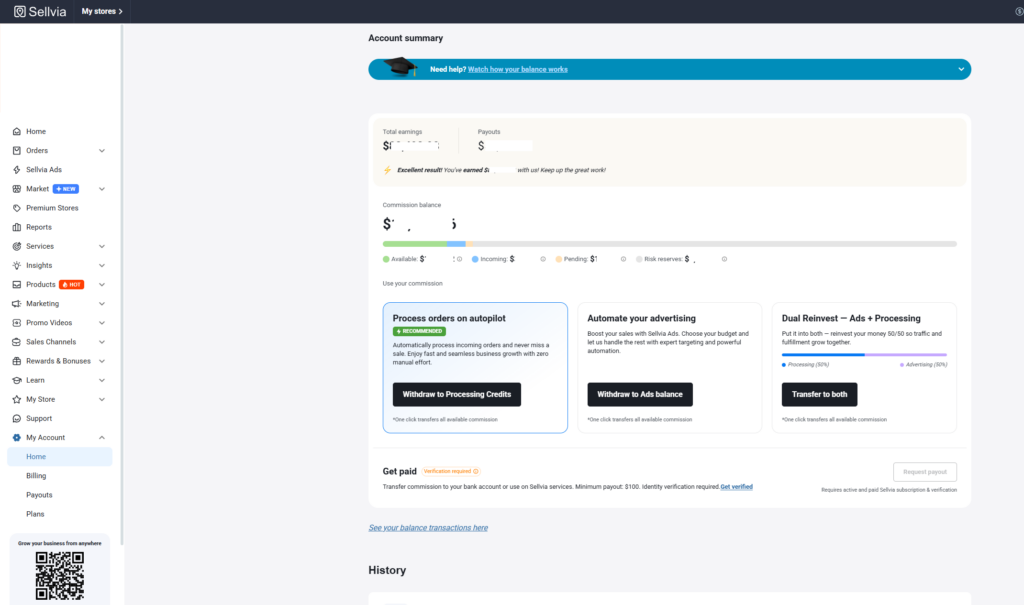
A large Commission Balance does not mean that the same amount can be withdrawn. Only the Available portion can be used or withdrawn. The standard minimum withdrawal is currently $100 per store, and bank withdrawals require an active paid subscription, identity verification, and phone verification.
Simple balance example
If a processed sale contributes $100 to the Commission Balance, approximately $75 may move to Available after the 72-hour hold and approximately $25 may remain in Risk Reserve for 125 days. The reserve is not presented as a permanent fee, but it is unavailable during that period.
How Sellvia Works Step by Step
Step 1: Create Your Sellvia Account
After signup, Sellvia provides access to the account and turnkey store. The current Sellvia PRO trial lasts 14 days from the date the store access details are provided. The subscription renews automatically unless it is canceled before the charge, so note the exact trial expiration and renewal date immediately.
Open My Account → Plans and verify which subscription is attached to the store. Current listed Sellvia PRO options are Basic at $39 per month, Advanced at $99 per month, and Ultimate at $299 per month. Basic is the normal beginner starting point; the higher plans mainly expand catalog and server capacity and should not be treated as a guarantee of more sales.
Step 2: Review the Dashboard Before Making Changes
Resist the urge to click every available button on your first visit. Instead, work through a short checklist:
- Account status and trial dates
- Subscription terms
- Current balances
- Product catalog
- Ads section
- Orders section
- Reports
- Available support materials
Understanding the layout before making changes means you won’t accidentally activate paid features you weren’t ready for.
Step 3: Review Your Ready-Made Store
Look over the store name, homepage, navigation, product categories, and how everything displays on mobile – most of your future visitors will likely be on a phone. Check the legal pages, the checkout path, the product descriptions, and the contact information. A store that looks complete on the surface can still have a broken or confusing checkout flow underneath, so click through it yourself before sending any traffic there.
Step 4: Choose a Focused Product Direction
Rather than adding products at random, evaluate each one against a short set of questions: Who is the target audience? What problem does it solve? Is the offer clear at a glance? Is the price reasonable for that audience? What’s the potential margin? Would this product make sense to someone arriving from a paid ad, with no other context?
For example, a productivity-focused checklist bundle aimed at remote workers is easy to evaluate quickly: clear audience, clear problem (disorganization), clear price point. A generic “how to be successful” ebook with no defined audience is harder to sell precisely because it’s harder to target with advertising.
Step 5: Add and Organize Products
There’s no single “correct” number of products to launch with, and I wouldn’t trust a guide that hands you a strict number without qualification. What matters more is organization: group related products into clear categories, and resist adding items just because they’re available. A smaller, well-organized catalog usually performs better than a large, scattered one, since visitors can actually understand what the store offers within a few seconds of landing on it.
Step 6: Understand Your Costs Before Activating Ads
The monthly subscription is only the first line in the budget. A realistic Sellvia plan separates fixed platform access, traffic acquisition, the cost of processing customer orders, optional automation, transaction fees, and cash-flow reserves.
| Cost category | Current baseline or trigger | Why beginners miss it | Planning action |
|---|---|---|---|
| Sellvia PRO subscription | Basic currently starts at $39/month after a 14-day trial | The low entry price is mistaken for the full business budget | Record the renewal date and keep one renewal outside the ad budget |
| Sellvia Ads spend | Starts at $10/day; higher levels unlock over time | The daily number looks small when the monthly total is not calculated | Calculate the whole test period before activating ads |
| Advertising management fee | Sellvia currently lists a 28% advertising fee on daily Ads-balance charges | The selected daily budget is not necessarily the final charge | Use total cash charged, not just media spend, in profitability calculations |
| Order cost and processing fee | Paid when Sellvia fulfills a product on your behalf | The customer payment is visible before the seller funds fulfillment | Keep dedicated working capital for new orders |
| Order Processing Credits | Optional; a 28% fee applies when topping up credits | Automation is confused with free processing | Compare automatic credits with manual card processing |
| Sellvia Payments referral fee | Current Help Center lists 19% per completed order processed through Sellvia Payments | Gross revenue is mistaken for commission profit | Calculate profit from the Commission Balance and actual receipts |
| Payout fees | Depend on withdrawal method | Available balance is assumed to equal bank proceeds | Choose the method before forecasting take-home cash |
| Risk Reserve | 25% of each processed sale held for 125 days under current rules | It is part of Commission Balance but not immediately accessible | Do not use reserve funds in the next-month operating plan |
The safest rule is simple: never activate an advertising budget that would leave you unable to pay for the orders it may generate.
Step 7: Set a Realistic Testing Budget
A beginner budget should be defined before ads are switched on. The figures below are planning examples, not performance forecasts, and they exclude product-specific fulfillment costs because those depend on what customers buy.
| Scenario | Planned ad spend | Subscription | Additional cash to reserve | Purpose |
|---|---|---|---|---|
| Five-day system check | $50 at $10/day | $39 if the paid period begins | Ad management fees plus enough card capacity for early order processing | Confirm tracking, checkout, ads, and the order workflow |
| Fourteen-day controlled test | Approximately $185 using five days at $10, five at $15, and four at $20 | $39 | Management fees, fulfillment capital, and a small emergency buffer | Collect early traffic and order data without committing to a full month |
| Thirty-day staged test | $625 under the current unlock schedule | $39 | Management fees, order-processing capital, payout fees, and cash unavailable in Incoming or Risk Reserve | Observe a longer learning cycle and calculate a more meaningful cost per order |
The full cash requirement is higher than the subscription plus ad spend. For example, the 30-day scenario begins with $664 before advertising-management fees, order costs, transaction fees, payout costs, optional tools, or working capital are added.
Step 8: Activate Sellvia Ads Carefully
- Open Automated Promotions and review the current Ads status.
- Confirm the active daily budget and whether a welcome credit is being used.
- Write down the start date, the selected product direction, and the maximum total cash you are prepared to spend.
- Check that Sellvia Payments is the intended payment gateway; current Sellvia guidance says Sellvia Ads works exclusively with Sellvia Payments.
- Record daily charges, visitors, orders, processed orders, refunds, and the Available balance.
- Do not raise the daily level because of one strong day. Higher budgets buy more reach; they do not repair weak unit economics.
- When pausing, confirm the toggle status and review whether an invoice was already generated while the service was active.
The Learning stage can be unstable. Sellvia currently describes a typical learning period of 14–30 days or 100-plus conversions, depending on the channel. That does not mean a beginner must spend indefinitely; it means a decision should be based on a predefined budget and enough data to make the test interpretable.
Step 9: Monitor and Process Your First Orders
When a customer pays, the order appears in the dashboard and the money enters Pending. Sellvia still requires the order cost to be paid before fulfillment. You can process the order manually with a bank card or use Order Processing Credits for automatic processing.
Manual processing means opening Orders, selecting the order, clicking Process order, and paying with your card. It takes more attention but avoids the 28% top-up fee attached to Order Processing Credits. Automatic processing deducts the order cost from the credits balance, but sufficient credits must be available before the order arrives.
Current guidance states that unprocessed orders remain Pending for up to seven days and are then canceled and refunded. Sellvia also lists possible late-processing charges when fulfillment is delayed, so “seven days” should be treated as an emergency deadline, not the normal operating target.
Order contribution = customer payment − product/fulfillment cost − transaction and order-related fees
Do not subtract the entire monthly ad budget from each order. Advertising is either treated as a monthly planned cost or allocated across all orders as cost per order.
Step 10: Understand Pending, Incoming, Available, and Risk Reserve
After an order is processed, the funds move from Pending to Incoming for 72 calendar hours. Under the current balance rules, 75% then moves to Available and 25% moves to Risk Reserve for 125 days. This timing creates a real working-capital gap: you may need to pay for the next orders before the money from previous sales is available.
Before requesting a bank payout, confirm that the Available amount meets the minimum for the selected method, the paid subscription is active, KYC is complete, and the phone number is verified. The current standard minimum shown for Available is $100, while some transfer methods have higher effective minimums or additional fixed fees.
Step 11: Review Reports and Make a Decision
After a reasonable testing period, use your reports to make one of four decisions: maintain the current setup, adjust the budget or product mix, pause the campaign, or scale up spending. Base that decision on ad spend, order volume, cost per order, profit per processed order, and cash flow – not on how the last 24 hours felt.
My First Experience Inside Sellvia
The first screens I reviewed were My Account → Plans, My Account → Home, Orders, Orders → Order Processing, and Automated Promotions. That sequence changed how I evaluated the platform. The storefront is the visible part, but the subscription, processing obligation, Ads status, and balance stages determine whether the business can operate without a cash-flow surprise.
The product and store areas were relatively intuitive. The balance area required more careful reading because Total Earnings is gross sales, Commission Balance is the profit moving through the system, and Available is only one portion of that Commission Balance. Seeing Pending, Incoming, Available, and Risk Reserve next to each other made it clear why a large headline number is not the same as cash that can be withdrawn.
I also checked the difference between manual order processing and Order Processing Credits. The automated option is convenient, but the 28% top-up fee changes the economics. A beginner who assumes all automation is included in the subscription can underestimate the real cost per completed order.
If I were opening a new account again, I would spend the first day recording four items before activating anything: the renewal date, the current Ads status, the order-processing method, and the amount of cash available outside the Sellvia balance. That small preparation is more valuable than adding dozens of products immediately.
My conclusion from the dashboard review is positive but practical: Sellvia reduces the technical work of assembling a store and operating system, yet the user still needs to manage costs, process orders, understand payment holds, and decide when advertising data justifies continuing.
A Practical 30-Day Sellvia Plan for Beginners
The first month should be treated as a controlled operating cycle, not a race to the highest Ads tier. The objective is to understand the dashboard, verify that the store and checkout work, collect usable traffic and order data, and finish the month with a clear decision.
Days 1–3: Map the system
Open My Account → Plans and record the trial end and renewal date. Review My Account → Home and write down the meaning of Total Earnings, Commission Balance, Pending, Incoming, Available, and Risk Reserve. Open Orders and Order Processing to decide whether you will process manually or maintain Processing Credits. Finally, inspect Automated Promotions and confirm whether Ads is active.
Days 4–7: Prepare the store
Choose one coherent product direction. Review the homepage promise, categories, product pages, mobile layout, legal pages, contact details, and checkout path. Place a test order only if the account setup supports it safely. Record your maximum 30-day cash budget, including funds held outside Sellvia for order fulfillment.
Days 8–14: Run a controlled traffic test
Activate Ads only after the budget is written down. Record the selected daily level, total charges, visitors, orders, processed orders, and refunds. Avoid changing the product direction, store design, and ad budget simultaneously. A controlled test must preserve enough consistency to show what produced the result.
Days 15–21: Calculate unit economics
For each processed order, record the customer payment, fulfillment cost, transaction fees, any processing charges, and the amount entering Commission Balance. Divide the total advertising cost by processed orders to calculate advertising cost per order. Also note how much remains in Pending, Incoming, and Risk Reserve.
Days 22–30: Maintain, adjust, pause, or scale
Maintain the setup if the data is incomplete but the budget remains controlled. Adjust one clear variable if a specific weakness is visible. Pause if the planned loss limit has been reached or the working-capital requirement is unsafe. Scale only when processed orders produce repeatable positive contribution after advertising and operating costs.
| Period | Main objective | Actions | Metrics to watch | Common mistake |
|---|---|---|---|---|
| Days 1–3 | Understand the account | Review Plans, Home, Orders, Processing, Ads, Reports | Renewal date, Ads status, available working capital | Activating paid tools before reading their terms |
| Days 4–7 | Prepare a focused store | Choose a direction, check mobile, product pages, checkout, policies | Store completeness and offer clarity | Adding unrelated products to look “bigger” |
| Days 8–14 | Collect controlled traffic data | Start Ads, record all charges and orders | Visitors, order rate, total cash charged | Judging the test after one day |
| Days 15–21 | Understand order economics | Process orders, calculate fees and contribution | Cost per order, contribution per order, Pending and Incoming | Calling gross sales profit |
| Days 22–30 | Make one evidence-based decision | Maintain, adjust, pause, or scale | Break-even gap, cash flow, repeatability | Scaling before proving positive economics |
How Much Money Do Beginners Need for Sellvia?
There is no universal starting figure because product costs, fees, and order volume vary. However, a useful budget must contain more than the $39 Basic subscription.
Starting cash requirement = subscription + planned ad spend + advertising fees + order-processing capital + transaction fees + optional tools + emergency reserve
A five-day system check begins with roughly $50 of media spend plus the subscription if the trial has ended. A 14-day staged test represents about $185 of media spend under the current unlock schedule. A full 30-day minimum staged path represents $625 of media spend. In each case, advertising management charges and sufficient external funds for fulfillment must be added.
Do not finance order processing from expected payouts
Customer funds first move through Pending and Incoming, and only 75% becomes Available after the current 72-hour hold. The remaining 25% may stay in Risk Reserve for 125 days. Your Commission Balance also cannot be used directly to process orders. Keep order-processing capital on a card or in Processing Credits before increasing traffic.
The correct beginner budget is therefore the amount you can afford to keep operating even when several orders are Pending, funds are in the 72-hour hold, and part of the commission is in Risk Reserve.
How to Calculate Your Sellvia Break-Even Point
Use one consistent accounting method. Do not include the full advertising budget in monthly costs and then subtract advertising cost per order again.
Method 1: Treat advertising as a monthly planned cost
Planned monthly costs = subscription + total advertising charges + fixed tools
Contribution per processed order = customer payment − fulfillment cost − transaction and order-related fees
Break-even orders = planned monthly costs ÷ contribution per processed order
Example: assume the subscription and total advertising charges equal $400 for the period. If each processed order contributes $20 after fulfillment and order-related fees, the store needs 20 processed orders to cover those planned costs.
Method 2: Allocate advertising to each order
Advertising cost per order = total advertising charges ÷ processed orders
Net result per order = contribution per order − advertising cost per order
Period result = processed orders × net result per order − fixed non-advertising costs
This method is useful after a test has produced enough processed orders. Use total advertising charges, including management fees, rather than only the selected media budget. Also calculate with processed orders, not every initiated checkout, because unprocessed or refunded orders do not create the same economic result.
Common Sellvia Beginner Mistakes
1. Treating $39 as the complete budget
The Basic subscription gives platform access, but it does not fund advertising or fulfillment. This mistake leaves the account active but the business unable to buy traffic or process new orders. Build the budget from all cost categories before the trial ends.
2. Activating Ads without checking the toggle and billing
A welcome credit can make the first activity feel free, but charges may continue after the credit is used if the service remains active. Record the Ads status, daily budget, saved payment method, and any generated invoice before assuming the campaign is paused.
3. Using the selected daily ad budget as the final cost
The daily level represents media spend, while Sellvia applies an additional advertising-management fee. Profit calculations based only on $10, $15, or $20 per day understate the amount actually charged. Use receipts and total Ads charges.
4. Adding too many unrelated products
A mixed catalog makes the store harder to understand and the advertising direction less coherent. Choose a defined audience and add products that solve related problems instead of importing everything available.
5. Confusing Total Earnings with withdrawable money
Total Earnings is gross sales, not profit. Commission Balance is divided among Pending, Incoming, Available, and Risk Reserve, and only Available can be withdrawn. Use the balance pipeline when planning cash.
6. Waiting too long to process an order
Current guidance gives up to seven days before an unprocessed order is canceled and refunded, but late-processing charges may apply earlier. Process promptly and treat the deadline as an emergency limit.
7. Assuming customer payments can fund fulfillment immediately
Customer money is held while the order still needs to be paid for. The Commission Balance cannot be used directly for processing. Maintain a separate card limit or sufficient Processing Credits.
8. Choosing automation without pricing it
Order Processing Credits save time, but a 28% top-up fee currently applies. Compare that convenience with manual processing by card and include the difference in the contribution per order.
9. Ignoring Risk Reserve
Under the current rules, 25% of each processed sale is held for 125 days. Treating that amount as next-month cash can create a working-capital shortage. Forecast Available funds separately from reserve funds.
10. Scaling on gross revenue
A high revenue number can coexist with weak or negative net economics. Scale only after calculating fulfillment, payment, processing, advertising, and payout costs using actual processed orders.
11. Changing several variables at once
Changing products, design, price, and budget together destroys the ability to identify what improved or damaged performance. Make one meaningful change and define the review period in advance.
12. Expecting a completely passive business
Sellvia automates infrastructure and can automate advertising and order processing, but the owner still manages budget limits, fulfillment capital, reports, refunds, and payouts. The platform reduces operational complexity; it does not remove management.
Sellvia Beginner Checklist
Account
- Confirm the 14-day trial expiration.
- Record the next recurring charge.
- Verify the active plan in My Account → Plans.
- Save account and recovery access securely.
Store
- Review homepage positioning and navigation.
- Check product pages on mobile.
- Test checkout and contact information.
- Review privacy, refund, and legal pages.
Products
- Choose one coherent audience and theme.
- Confirm each product’s fulfillment cost and fee structure.
- Avoid mixing unrelated product models without a plan.
- Organize clear categories.
Advertising
- Check whether Automated Promotions is active.
- Record the daily budget and total-charge limit.
- Include the advertising-management fee.
- Track processed orders, not just visits.
Order Processing
- Choose manual card processing or Processing Credits.
- Keep enough external working capital.
- Process orders promptly.
- Monitor credits so automation does not pause.
Balances
- Separate Total Earnings from Commission Balance.
- Track Pending, Incoming, Available, and Risk Reserve.
- Remember the 72-hour Incoming hold.
- Do not budget the 25% reserve before release.
Payouts
- Confirm the minimum for the selected method.
- Complete KYC and phone verification.
- Compare withdrawal fees and delivery times.
- Keep the subscription active before requesting a bank payout.
Analytics
- Record total ad charges daily.
- Calculate contribution per processed order.
- Calculate advertising cost per processed order.
- Set a loss limit before scaling.
Who Should Use Sellvia?
Sellvia tends to make the most sense for beginners who want a structured starting point rather than a blank slate, people specifically interested in selling digital products, users without prior store-building experience, and anyone who prefers working inside one integrated dashboard rather than piecing together separate tools. It also fits people willing to test paid advertising, who have a realistic budget beyond the subscription cost, and who are willing to check orders and finances on a regular basis rather than checking in once and expecting things to run themselves.
Who May Not Be a Good Fit?
Sellvia is probably not the right choice for someone expecting guaranteed income, since no ecommerce platform can promise that. It’s also a poor fit for anyone without a budget beyond the monthly subscription, or someone unwilling to test or manage an advertising budget at all. If you need complete technical control over every component of your store and business – custom code, fully independent tooling – Sellvia’s integrated approach will likely feel restrictive rather than helpful. The same is true if you’re looking for a fully passive system with no ongoing attention, or if you’re not prepared for the cash flow delays that come with a staged balance system.
None of this makes Sellvia a bad platform – it simply means the fit depends on your expectations and your willingness to treat it as a business, not a shortcut.
Is Sellvia Legit for Beginners?
It’s worth separating two different questions here: is Sellvia a legitimate platform, and does every user profit from it? The answer to the first is straightforward – Sellvia operates a real store structure, a real product catalog, a functioning dashboard, an actual advertising integration, an order workflow, and a balance and payout system. That’s a genuine operational business platform, not a shell or a placeholder.
The answer to the second question is more nuanced, and it’s true of any business platform, not just this one: legitimacy doesn’t equal guaranteed profit. Results depend on the product chosen, the advertising budget, how carefully orders and costs are tracked, and how the user responds to their own data. A platform being real and functional is a different claim than a platform guaranteeing a particular outcome, and conflating the two is where a lot of unrealistic expectations come from.
Is Sellvia Worth It for a Beginner?
For someone who values speed of launch, a ready-made structure, not having to build a product from scratch, a built-in traffic source, centralized tools, and a fairly clear sequence of steps to follow, Sellvia is likely to feel worth the investment. It removes a genuine amount of setup friction that would otherwise take weeks to replicate manually.
For someone who wants complete control over every element of their business, or who isn’t prepared to put real money into testing beyond the subscription itself, the value proposition is weaker. In that case, a more manual, DIY approach – even though it takes longer to set up – might match expectations better.
Final Verdict
Sellvia is a practical, structured option for beginners who want to start a digital-products business without independently assembling a store, a product catalog, an advertising system, order management, and a payout system from separate services. That’s a real time and effort savings, and it’s the platform’s clearest strength.
Whether that structure translates into a profitable outcome still comes down to the user: realistic budgeting, thoughtful product selection, advertising discipline, consistent order management, a clear understanding of cash flow, honest tracking of net results rather than gross numbers, and a willingness to make decisions based on data rather than emotion. Sellvia removes the technical starting line. What happens after that is still, as with any business, up to the person running it. For a broader evaluation of strengths, limitations, and overall value, read our complete Sellvia review.
Frequently Asked Questions
What is Sellvia?
Sellvia is a turnkey ecommerce platform that combines a hosted store, access to catalog products, automated promotional tools, order processing, reporting, account balances, and payout controls. It is designed to reduce the amount of technical work required to assemble an online store. This guide focuses on the digital-product workflow, while the wider catalog can include other product types.
Is Sellvia good for beginners?
Sellvia can be beginner-friendly because the store and core operating tools are already connected. A new user does not need to code a website or build an advertising stack from zero. However, the beginner must still understand recurring billing, advertising charges, fulfillment costs, order-processing deadlines, payment holds, and the difference between gross sales and withdrawable funds.
How much does Sellvia cost?
Sellvia’s current terms list Sellvia PRO plans at $39, $99, and $299 per month, with a 14-day trial after store access is provided. The practical cost can be much higher because advertising, management fees, product fulfillment, transaction charges, processing automation, optional services, and payout fees may apply. Confirm all current figures in My Account → Plans.
How does Sellvia Ads work?
Sellvia Ads is an optional managed advertising service. The current starting budget is $10 per day, with $15, $20, $30, and $50 daily levels unlocking after continuous activity milestones. Sellvia manages campaign creation and optimization across supported channels. A separate management fee is applied on top of ad spend, so the selected daily budget is not necessarily the total amount charged.
How much is a 30-day Sellvia Ads test?
Under the current minimum unlock schedule, five days at $10, five at $15, ten at $20, and ten at $30 equal $625 in media spend. This calculation excludes advertising-management fees, subscription charges, order fulfillment, transaction fees, and working capital. It is a budget illustration, not a prediction of traffic, orders, or profit.
How are Sellvia orders processed?
After a customer pays, the order appears in Pending and must be funded for fulfillment. The seller can process it manually with a card or use Order Processing Credits for automation. Credits are optional and currently carry a 28% top-up fee. Unprocessed orders can be canceled and refunded after seven days, so prompt processing is important.
Can I use my Sellvia balance to process orders?
The current Sellvia balance guide states that the Commission Balance cannot be used directly to fulfill orders. The seller must use a card or Order Processing Credits. Available funds can be transferred into Processing Credits, but a fee applies. This creates a working-capital requirement even when the dashboard already shows earnings from customer orders.
What do Pending, Incoming, Available, and Risk Reserve mean?
Pending contains paid but unprocessed orders. Incoming contains processed funds during the current 72-hour holding period. After that hold, 75% moves to Available and can be used or withdrawn, while 25% moves to Risk Reserve for 125 days. This full pipeline explains why Commission Balance and withdrawable cash can differ substantially.
What is the Sellvia minimum payout?
The current standard minimum shown for withdrawing Available funds is $100 per store, although individual bank-transfer methods can have higher practical minimums or fixed charges. A bank payout also requires an active paid subscription, completed identity verification, and phone verification. Always review the selected withdrawal method before forecasting the amount that will reach your bank.
Is Sellvia legit?
Sellvia operates a functioning store platform, product and fulfillment system, advertising service, order workflow, Commission Balance, and payout process. Those features support the conclusion that it is a real operating platform. That does not mean every user will be profitable. Profit depends on the selected products, total fees, advertising efficiency, order processing, refunds, and cash-flow management.
Can beginners make money with Sellvia?
Beginners can generate sales and potentially earn profit, but no result is guaranteed. The correct test is whether processed orders produce positive contribution after fulfillment, transaction, processing, and advertising costs. The user must also account for the 72-hour Incoming hold and the 25% Risk Reserve instead of treating all displayed earnings as immediately available cash.
What is the biggest Sellvia beginner mistake?
The most damaging mistake is activating paid traffic before calculating the full operating budget. A beginner may have enough money for the subscription and several days of Ads but not enough to process the resulting orders. The solution is to reserve fulfillment capital, include every fee, and define a maximum loss before traffic begins.
Editorial Note and Sources
This guide was fact-checked in July 2026. Sellvia can update pricing, fees, payout rules, product availability, and dashboard terminology, so confirm the current conditions before making a payment or financial decision.

Jennifer Mitchel is a contributing author at Sellvia.info who writes about the practical decisions involved in using Sellvia for a digital business. Her research focuses on platform onboarding, product selection, advertising strategy, subscription expenses, and the movement of funds from completed orders to available payouts. Jennifer pays close attention to the questions beginners often face, presenting each topic through straightforward explanations, realistic scenarios, and careful analysis of both opportunities and operational responsibilities.

the 30 day plan broken into week by week phases is more actionable than any other beginner guide i’ve read for this platform
the ads unlock schedule table showing $10 to $50 per day over the first 30 days finally explained why my daily charge kept increasing even though i never manually changed anything
the “beginner challenge vs how sellvia helps vs what you still need to do” table should be the actual homepage of the platform honestly
this is the first guide i’ve read that separates the store setup work from the actual business decisions you still have to make, most content pretends the second part doesn’t exist
same, wish i’d read this before turning on ads instead of figuring out the escalating budget by surprise
the $625 thirty day staged test figure matches almost exactly what i ended up spending in my own first month before i understood the unlock schedule
the point about choosing one coherent product theme instead of adding everything available in the catalog is something i learned the hard way after my first scattered attempt
the my first experience section is genuinely useful, most sellvia content is either promotional or a rant, this reads like an actual person walking through their dashboard
appreciate the distinction between manual card processing and order processing credits with the 28% top-up fee spelled out clearly, i went manual for month one specifically because of that fee
worth reading next to the sellviaexperience thread on what nobody tells you before starting, similar spirit but from a community discussion angle instead of a structured guide
the common mistakes list nails almost every mistake i personally made, especially treating $39 as the complete budget
this level of specificity, actual dollar figures and actual day counts, is rare for beginner content about this platform
the launch checklist at the end is genuinely something i printed out and used, broken into account, store, products, advertising, processing, balances, payouts, and analytics
the point about a focused smaller catalog performing better than a large scattered one matches my own experience exactly, cut mine down after reading something similar
same, went from 40 something products down to about 12 and my numbers actually improved
the “who should use sellvia vs who may not be a good fit” sections are the most honest framing i’ve seen, most guides just assume everyone is a good fit
the step by step walkthrough from account creation through order processing to payout review is more thorough than the platform’s own onboarding materials
the section on why customer payments can’t fund fulfillment immediately explains the exact cash flow surprise i hit in week two
the emphasis on changing only one variable at a time before drawing conclusions is advice i wish someone had given me before i changed my ad budget, product mix, and store design all in the same week
most thorough beginner walkthrough i’ve found for this platform, saving this for anyone who asks me where to actually start